- ★★
- ★★
- ★★
- ★★
- ★★
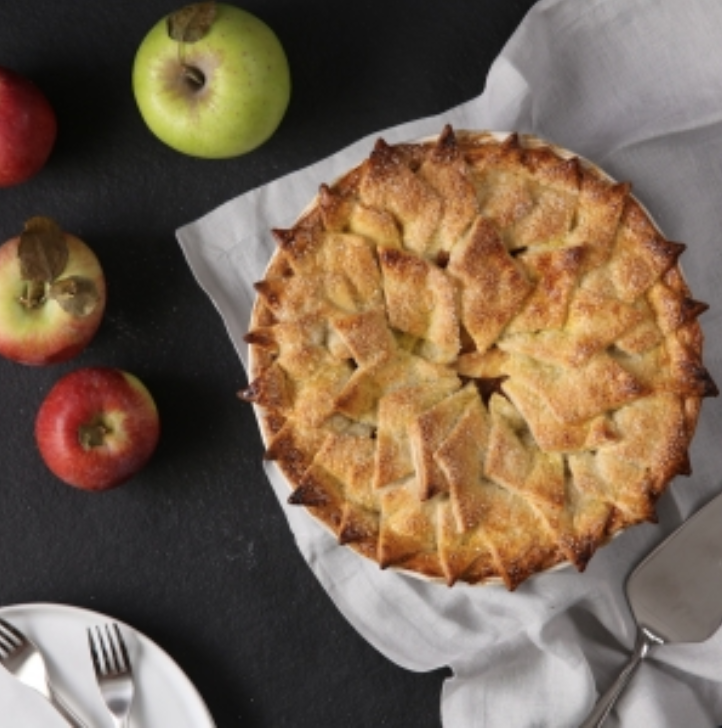
Need some pie inspo for this holiday season? We can't get enough of this shingled apple pie!
Pie crust design inspired by @melinahammer
Recipe Card
ingredients
For the pie dough:
- 3 3/4 cup Bob's Red Mill Organic Unbleached White All Purpose Flour
- 1/4 cup granulated sugar
- 2 teaspoons salt
- 1 cup plus 2 tbsp butter, cubed
- 1/2 cup ice water
- 1/2 cup ice cold vodka (straight from freezer works best)
ingredients
For the pie filling:
- 3 Large Granny Smith Apples, peeled, cored and cut into 1/4” slices
- 3 Large Braeburn Apples, peeled, cored and cut into 1/4” slices
- 2 tablespoons Bob's Red Mill Organic Unbleached White All Purpose Flour
- Juice and zest of one lemon
- 1/2 cup brown sugar
- 1 tablespoon ground cinnamon
- 1/2 teaspoon ground nutmeg
- Pinch of cardamom (optional)
- Pinch of sea salt
ingredients
To finish the pie:
- 1/3 cup heavy cream
- 2 tablespoons sanding sugar, for sprinkling
Method
Step 1
To make the dough, set the cubed butter in the freezer for at least one hour before making the dough. When butter is frozen, add 2 cups of flour, sugar and salt to a food processor. Pulse a few times until well combined. Add butter and process until incorporated and the butter is broken into pea-sized clumps. Add the remaining flour and pulse a few times. Alternatively, you could do this step by hand with your fingers, a pastry cutter or two butter knives.
Step 2
Dump contents of food processor into a large bowl then drizzle water and vodka over the flour mix and fold together gently until the dough starts to come together. Gather into a ball, then divide into three portions. Form dough into discs and wrap with wax paper or plastic wrap and set in the fridge for at least two hours, or overnight.
Step 3
Meanwhile, make the filling. Add apples to a large bowl and toss with the lemon juice and zest. Add flour, brown sugar, cinnamon, nutmeg, cardamom (if using) and sea salt and mix well. Set aside in fridge while you roll out the pie crust.
Step 4
To assemble the pie, start with one portion of dough (keep the other two in the fridge). Dust surface and rolling pin with flour and roll out dough into a circle about 12 inches in diameter. Use the rolling pin to transfer the dough round to a 9 inch pie plate and trim edges. Set in the fridge while you make the shingles.
Step 5
Remove the next portion of dough from the fridge. Dust surface and rolling pin again, and roll out into another 12 inch circle. Using cookie cutter or shape of choice (we used a small diamond cutter) cut out as many shapes as possible from the dough round. Place on a plate and set in the fridge while you repeat with the third and final portion of dough. Save any dough scraps in the fridge.
Step 6
Now, assemble the pie! Add prepared filling to prepared pie plate. Pat apples down with your hands for you have a semi smooth surface to add the dough shingles to.
Step 7
Brush the edge of the crust with heavy cream, then start layering the dough shapes around the edges, overlapping each one slightly, and using the heavy cream as “glue” to secure them to each other. When you finish the outer edge, repeat with two more rows, until the entire pie is covered. We used about 40 diamonds to cover the entire pie. This will vary depending on the shape you use, but you can always re-roll any dough scraps you accumulate to cut out additional shapes as needed, or just save to use for a rustic galette!
Step 8
To bake the pie, preheat the oven to 400˚F and place pie on a sturdy sheet pan to catch any drips. Brush the entire thing with heavy cream, then sprinkle with the sanding sugar.
Step 9
Bake at 400˚F for 20 minutes, then reduce heat to 375˚F and bake for an additional 35-40 minutes. Check the pie every 10 minutes or so to make sure it isn’t browning too quickly. If it is, you can cover the edges with tin foil.
Step 10
Let pie cool completely before serving, preferably with vanilla ice cream!

