Gilded Dark Chocolate Cake
With Champagne Buttercream
- ★★
- ★★
- ★★
- ★★
- ★★
Yes, it's true. January brings with it lots of responsibility. The presents and cheer of December are faded memories that went into the trash with the wrapping paper and tinsel. But fear not. Whilst we're knee-deep in juices and cleanses and new exercise routines, we have at least one special occasion that requires (no, DEMANDS) indulgence. And that, my friends, is the Golden Globes. I was beyond excited when the feedfeed + Lindt Chocolate asked me to create a decadent, beautiful dessert for our Golden Globe parties because Lindt is the Official Confection of the Golden Globe Awards for the second year. Because we're having them. Even if we're in our pajamas...it's happening.
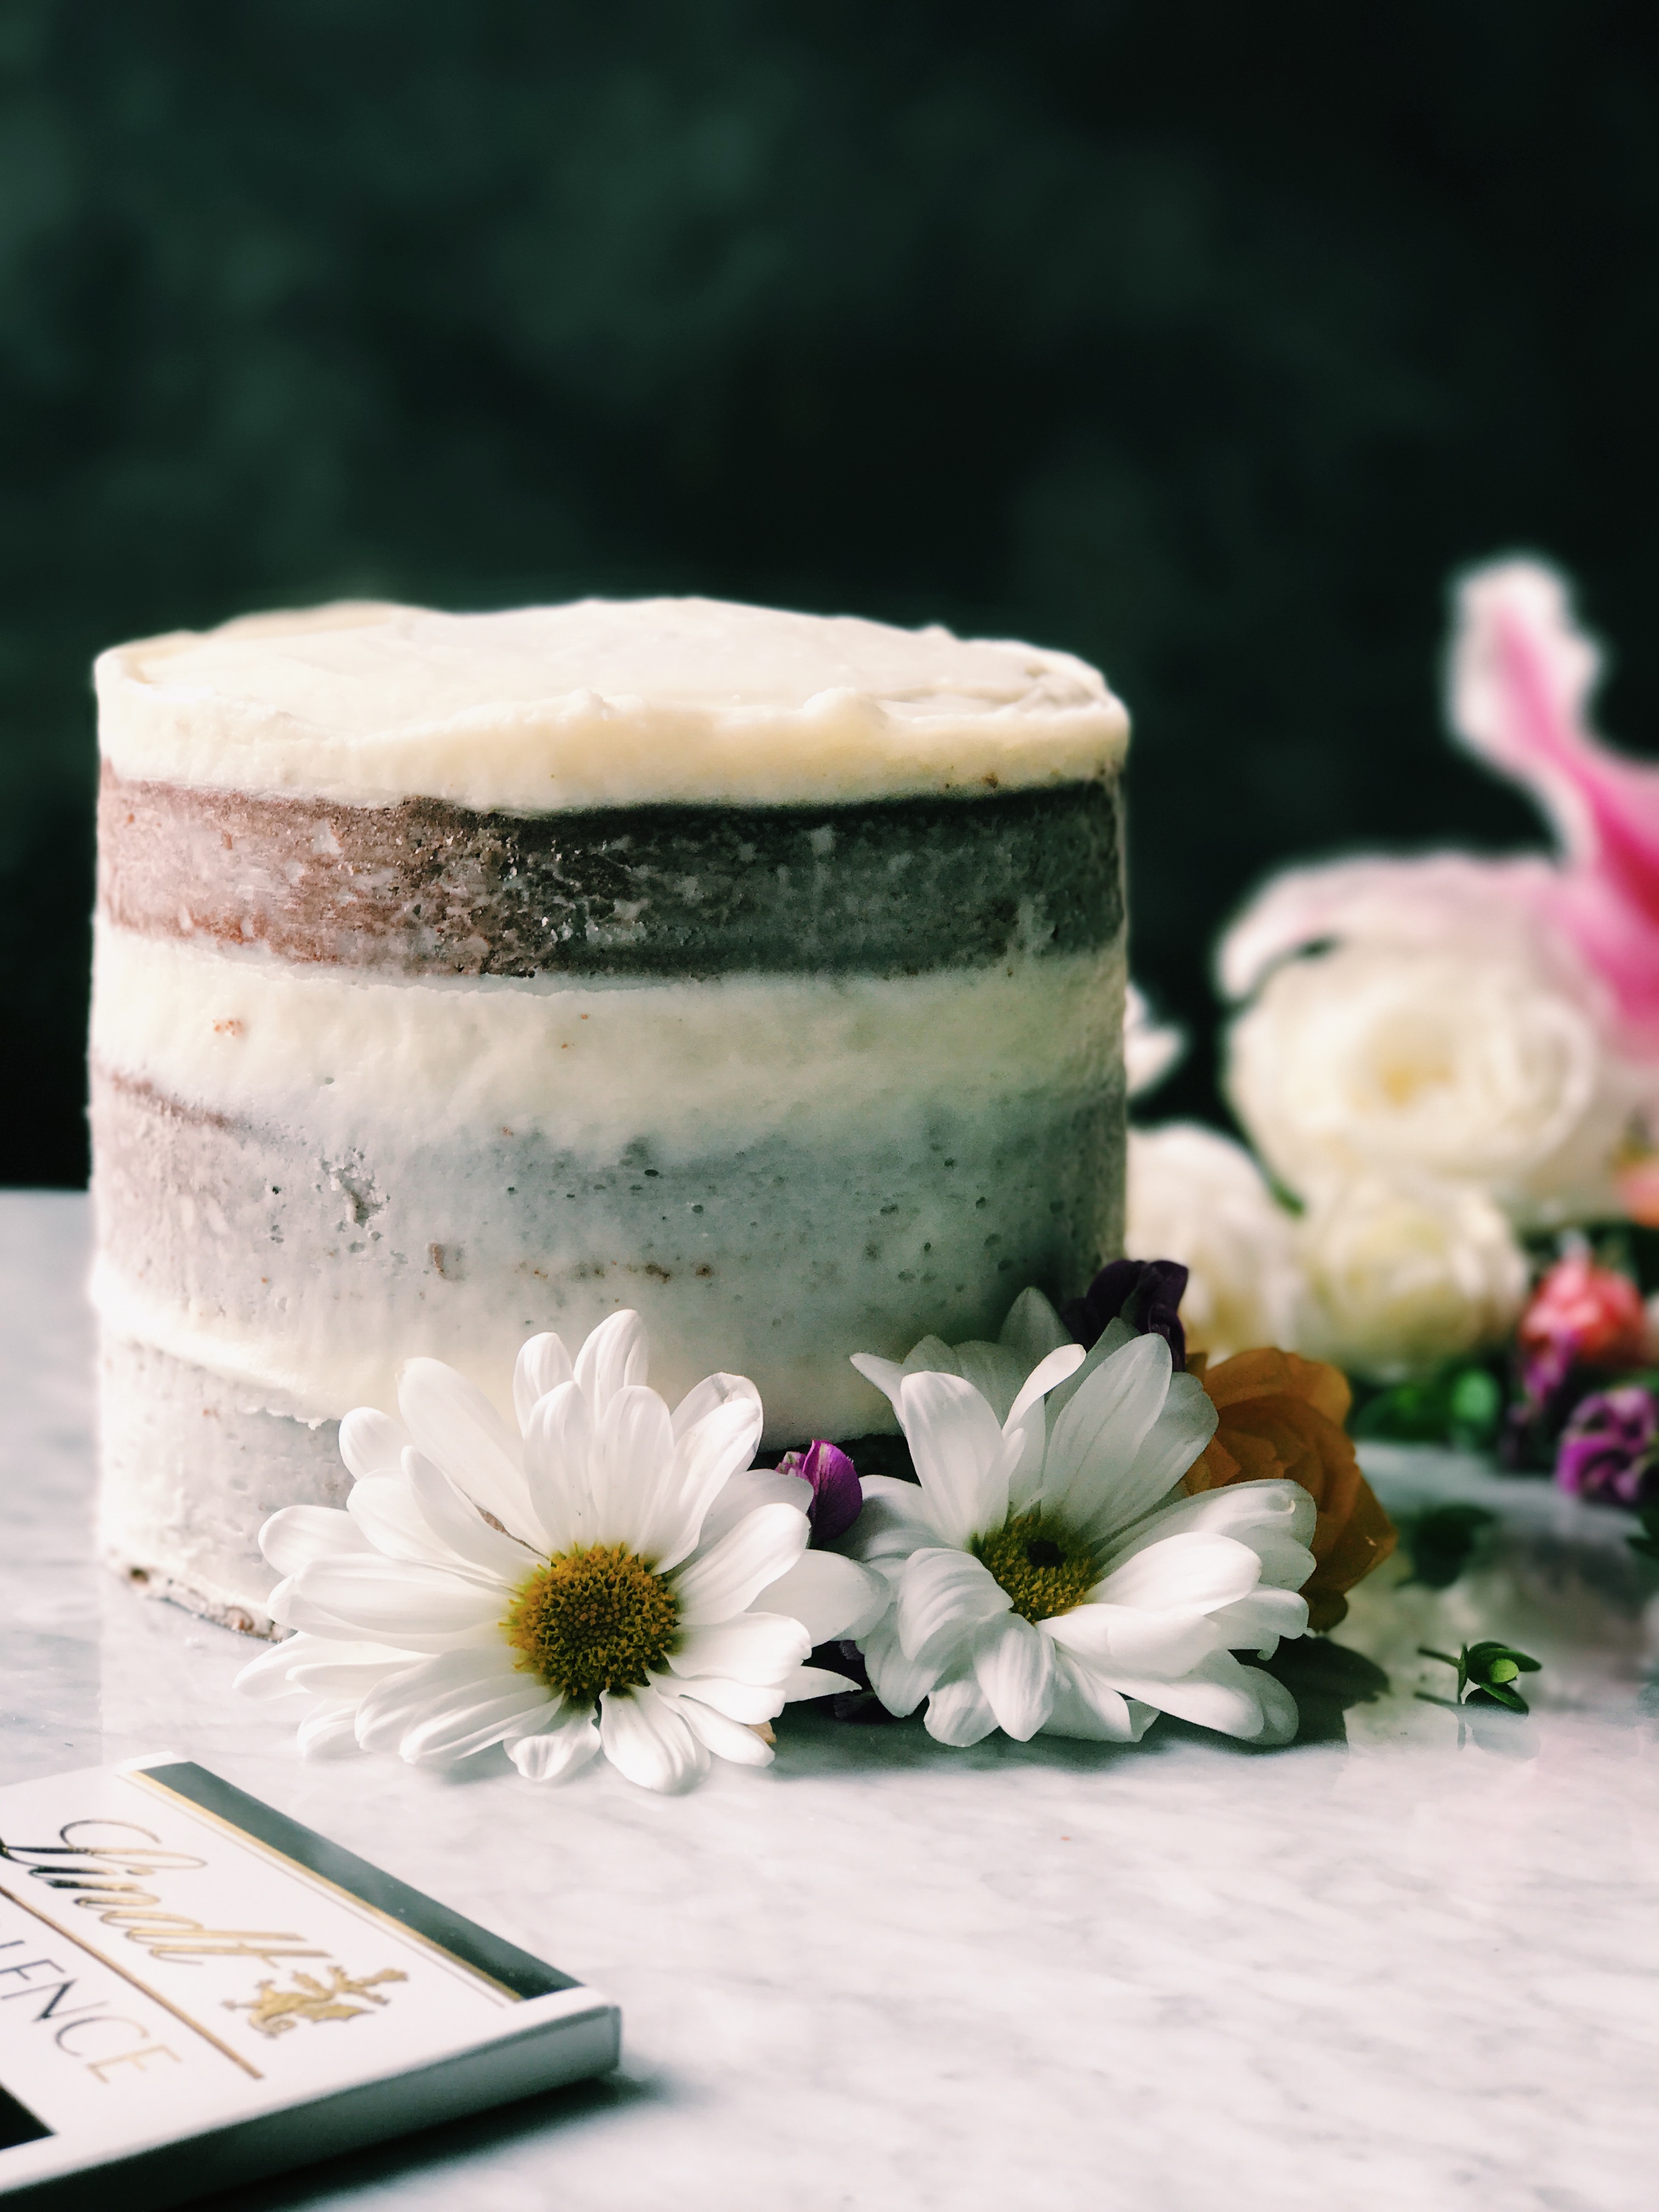
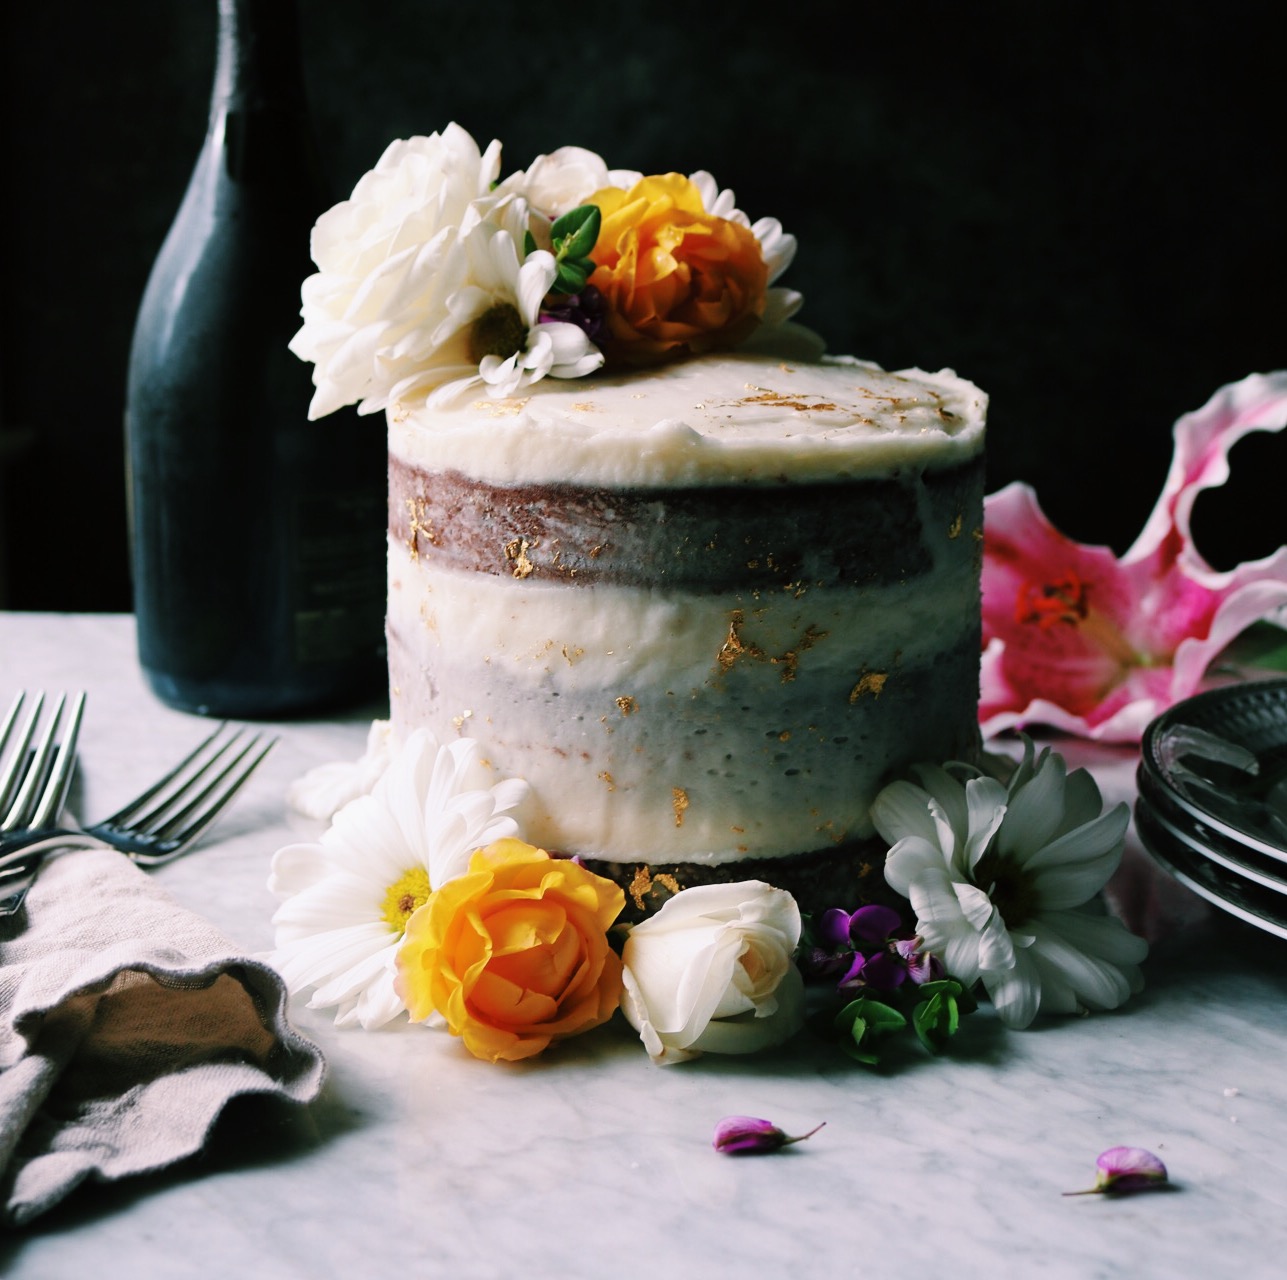
I always strive to bring you accessible recipes and I know what you're thinking: that this looks hella difficult. But she's deceiving. She's actually a basic rich (and delicious) chocolate cake coated with champagne buttercream jazz hands. I love jazz hands. This bubbly addition is mostly an excuse to drink champagne while we bake + frost cake. We're also making a naked cake so that mistakes look like they're by design. Then we bust out the flowers to mask errors further. Lastly, we’re throwing edible gold leaf about and channeling our inner J.Lo. And yep, don’t fret, we can make the cake + frosting ahead of time. You're welcome.
Be sure to tune into the #LindtGoldenGlobes Twitter Party happening on January 8th from 8-9PM EST!
Before We Get Started:
- Patience. Mix your ingredients on low. I can't stress this enough. If you have your mixer on high, you'll whip too much air into the cake batter and you'll get an annoyingly domed cake thing happening that makes frosting and stacking cakes near impossible.
- Champagne. Pick something you would actually drink...because you're not using that much for the frosting and you deserve a glass. And that should be your policy regardless when cooking and baking with booze. As a side note, you won’t taste champagne in the frosting but it brings this welcome acidity to the buttercream that cuts through some of the sweetness. It might be my new favorite thing. If you don't drink alcohol, feel free to use milk to thin the buttercream.
- Flowers. I had all of these great plans to go to the florist and get exotic flowers and then I thought: why? These are from my backyard and the grocery store. I like having mostly white and then grabbing some brighter flowers for pops of color. I steered clear of red flowers because it felt too December…and we’re over that already.
- Edible gold leaf. Pull up a chair. Let's talk gold leaf. First, I'm not going to lie...it's tricky. Make sure you get edible gold leaf...that's extremely important. The kind I use comes in sheets. Make sure you don't have the heater (or AC) on while you're using it...it's like tissue paper meets plastic wrap...it will blow around and stick to everything with the slightest air movement. The gold sheets should have a tissue paper backing, use that to maneuver the gold leaf around the cake. Allow time to get zen and zoned out while putting it on the cake. You'll need a clean, never-before-used paintbrush to apply it to the cake. I don't want to scare you...but knowledge is power. PS There are lots of videos on the Internet of people using gold leaf on cakes...watch a few. It's extremely helpful to see professionals handle this wily beast before you get started.
- Room temperature. Sometimes I say 'room temperature' but it’s not an end-of-days scenario if things aren’t completely room temp. This is one of those instances where I really mean it. Since we're melting the chocolate, if we were to blend it with cooler ingredients (think sour cream and buttermilk) it will seize. So along these same lines, let the melted chocolate cool completely, with periodic stirring, before moving on to the next step.
- Make Ahead Tip. You can bake the cakes and let cool completely. Once cooled, wrap tightly in plastic wrap + foil and store at room temperature. Place the frosting in a re-sealable container and store in the fridge until ready to use. Bring to room temperature before frosting the cake.
- Lastly… I don’t have you trim the cakes or put one upside down or any of that. Let’s just keep it simple.
Let's get our bake on!
Gilded Dark Chocolate Cake With Champagne Buttercream
Makes One 3-layer, 6-inch Cake
INGREDIENTS
For the Cake
- 1 tablespoon each all-purpose flour + butter for your pans
- 6 ounces Lindt EXCELLENCE 70% Dark Chocolate, chopped
- 1 cup neutral-flavored vegetable oil (I use Sunflower Seed Oil)
- 1 1/2 cups granulated sugar
- 1/3 cup light or dark brown sugar, packed
- 1 cup sour cream, room temperature
- 3 large eggs, room temperature
- 1 tablespoon real vanilla extract
- 3/4 cup shaken buttermilk, room temperature
- 1/4 cup fresh-brewed espresso or strong coffee, slightly cooled
- 2 cups all-purpose flour
- 1/4 cup cornstarch
- 3/4 cup unsweetened cocoa powder (I love the extra dark kind)
- 2 teaspoon baking powder
- 1 ½ teaspoon sea salt
- 1 teaspoon baking soda
For The Frosting
- 8 ounces cream cheese, room temperature
- 8 tablespoons butter unsalted butter, room temperature
- 1 tablespoon vegetable shortening
- 3 tablespoons champagne
- 5 cups powdered sugar
To Decorate
- 2 sheets edible gold leaf*
- Flowers…pick your favorites
*I used two small sheets (2x2) for this cake. If you are new to using gold leaf, you may want additional sheets.
INSTRUCTIONS
1. Preheat the oven to 350 degrees F and place a rack in the middle of the oven. Butter + flour three, 6-inch cake pans.
2. Place your chopped chocolate + oil in a medium, microwave-safe bowl and microwave on high for 1 minute. Stir until all of the lumps are gone and the chocolate is completely melted. If your microwave runs hot, cut back on the time so as not to burn your chocolate. Set aside, stirring periodically, and let cool completely.
3. In an electric-stand mixer fitted with the paddle attachment (or you can also use a large bowl + spatula) add the melted chocolate mixture, granulated sugar and brown sugar and blend on low until completely mixed together. Add in the sour cream, eggs and vanilla, and blend on low until mixed. Lastly, with the mixer still on low add in your buttermilk + espresso. Scrape the sides and bottom of the bowl to make sure everything is incorporated. Take the bowl out of the stand mixer.
4. Whisk together the all-purpose flour, cornstarch, cocoa powder, baking powder, sea salt and baking soda in a medium bowl.
5. Throw your flour mixture into the chocolate-sugar mixture and stir until just blended, in as few strokes as possible. The cake batter will appear lumpy, like muffin batter.
6. Put about 2 cups of batter into each cake tin. Gently smooth the tops a bit so they're level and tap the tins on the counter to release any trapped air bubbles.
7. Put the tins on a baking sheet and shove on the middle rack of the oven for 30-35 minutes. When done, insert a toothpick into the center of the cakes. If it comes out clean, they are done. If it comes out a little gooey, put them back in for a couple more minutes.
8. While the cakes are cooking, whip together your buttercream. Quickly clean your mixer bowl + paddle attachment. Add the cream cheese, butter + shortening to the bowl and blend on medium until they are completely blended together. Add in 3 cups of powdered sugar and blend on low until combined. Add the final two cups of powdered sugar. With the mixer on low, drizzle in the champagne and mix until everything is smooth, lump free and well combined. Set aside until your cakes are cool and ready to frost. (At this point, you could put the frosting in an airtight container and store in the fridge until ready to use.)
9. As soon as they’re out of the oven, set the cake pans directly on a cooling rack and let them start to cool down.
10. After 30 minutes run a knife along the edge of the cakes. Then, flip them over, with one hand on the cake and gently tap the bottom of the cake round to help release the cake from the pan. If it’s not easily coming out, flip it back over and let it continue cooling. You don’t want to force it out of the pan or you’ll have parts of your cake stuck to the pan. The cakes must be completely cool before frosting. (Once cool you could tightly wrap the cakes and store at room temperature overnight until ready to frost.)
11. To frost, set the first layer flat side down. Glob about 1 cup of frosting on the top and gently smooth over. Get down to eye level and make sure it’s level. It doesn’t need to look perfect, just level. Set the second layer, flat side down, on top of the frosting. Glob 1 cup of frosting on top and smooth until it’s covered and even. Set the third layer on top, flat side down, making sure all of the sides are even and your cake isn’t leaning. Gently adjust if necessary. Put at least 1 cup of frosting on top and smooth until level. For the sides of the cake, I like to start by filling the area between the layers with big spoonfuls of frosting (use a spatula or the back of a spoon to fill between the layers). Once those cracks are filled, start patching globs of frosting around the cake. Once it is mostly covered in frosting, grab something with a straight edge (such as a bench scraper) and run it around the outside edge of the cake to smooth the frosting and show some of the cake beneath. Continue until you get that rustic, naked-cake vibe we’re going for. Frequently clean your bench scraper and continue until smooth. I think the best tip for frosting a cake is to chill…don’t stress…and pretend that every naked spot, curve and dip is exactly where it should be. That’s pretty much how I leave the house every day. Let your cake sit at room temperature for 1-2 hours before you move on to the gold leaf...you want the frosting to be dried and firm before proceeding.
12. Gold leaf... Using a clean, small-size paintbrush, paint bits of water randomly on the cake. Use the tissue paper that the gold leaf is resting on to press the gold leaf against the wet spots and use your paintbrush to break off small bits of gold leaf. Gently run the wet paintbrush over the gold leaf on the cake, to create a rustic, antique look. This takes patience. And practice. Don't panic if a large chunk of gold leaf gets on there or it starts to fold over on itself in clumps. Take a deep breath, wet your paintbrush and gently brush and move the gold leaf around the cake. Your first go will not be perfect...unless you have mad skills that I know nothing of. But keep at it and you'll get the hang of it. I like to place the gold leaf sporadically around the sides and top of the cake. For me, less is more.
13. Place flowers along the base of the cake and also on the top of the cake. For the top of the cake, I like to focus on one quarter of the top of the cake. Stand back. Look at her. She's stunning. You did good.
14. Thanks so much for making this cake!! Tag me @displacedhousewife #displacedhousewife so I can see your gorgeous cakes!!
This post was sponsored by Lindt Chocolate + feedfeed. All opinions and thoughts are my own. A big THANK YOU to both for including me in this campaign!
Sending lots of love + peace,
Rebecca xoxo